UML Class Diagram

Intro

The UML class diagram is a graphical notation used to construct and visualize object oriented systems. A class diagram in the Unified Modeling Language(UML) is a type of static structure diagram that describes the strctures of a system by showing the system’s:

  • classes
  • their attributes
  • operations(or methods)
  • the relations among objects

UML Class Notation

A class represent a concept which encapsulates state(attributes) and behavior(operations).Each attributes has a type.Each operation has a signature.The class name is the only mandatory information.

Class Name:

The name of the class appears in the first partion.

Class Attributes:

Attributes are shown in the second partion.

The arttribute types in shown after the colon.

Attributes map onto member variables(data members) in code.

Class Operations(Methods):

Operations are shown in the thire partion.The are services the class provides.

The return type of a method is shown after teh colon at the end of the method signature.

The return type of method parameters are shown after the colon following the parameter name.Operations map onto class method in code.

Class Visibility

The +,- and # symbols before an attribute and operation name in a class denote the visibility of the attribute and operation.

  • + denotes public attributes or operations
  • - denotes private attributes or operations.
  • # denotes protected attributes or operations.

Relationships between classes

UML is not just about pretty pictures.If used correctly,UML precisely conveys how code should be implements diagrams.If precisely interpreted, the implemented code will correctly reflect the intent of the designer.

A relationship can be one of the following types:
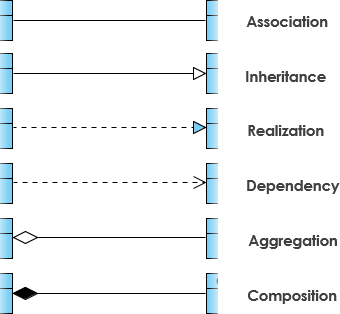
Inheritance(Generalization)

A generalization is a taxonomic relationship between a more general classifier and a more specific.Each instance of the specific classifier is also an indirect instance of the general classifier.Thus,the specific classifier inherits the features of the more general classifier.

  • Represents an is-a relationship.
  • An abstract class name is shown in italics.

Realization

Realization is a relationship between teh blueprint class and the object containing its respective implementation level details.This object is said to realize teh blueprint class.In other words, you can understand this as the relationship between the interface and the implementing class.

Association

Association are relationships between classes in a UML Class diagram.They are represented by a solid line between classes.

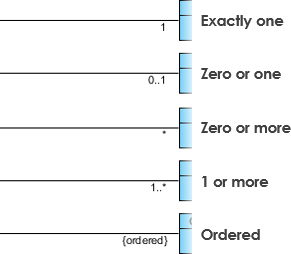
Cardinality

Cardinality is expressed in terms of:

  • one to one.
  • one to many.
  • many to many.

Aggregation

A special type of asscociation.

  • It represents a part of relationship.
  • Class2 is part of Class1.
  • Many instances of Class2 can be associated with Class1.
  • Object of Class1 and Class2 have separate lifetimes.

Composition

  • A special type of aggregation where parts are destroyed when the whole is destroyed.
  • Object of Class2 live and die with Class1.
  • Class 2 can not stand by itself.

Dependency

An object of one class might use an objcet of anther class in the code of a method.If the method is not stored in an field,then this modeled as a dependency relationship.

  • A special type of association.
  • Exists between two classes if chagnes to the definition of one may cause changes to the other(but not the other way around).
  • Class1 depends on Class2.

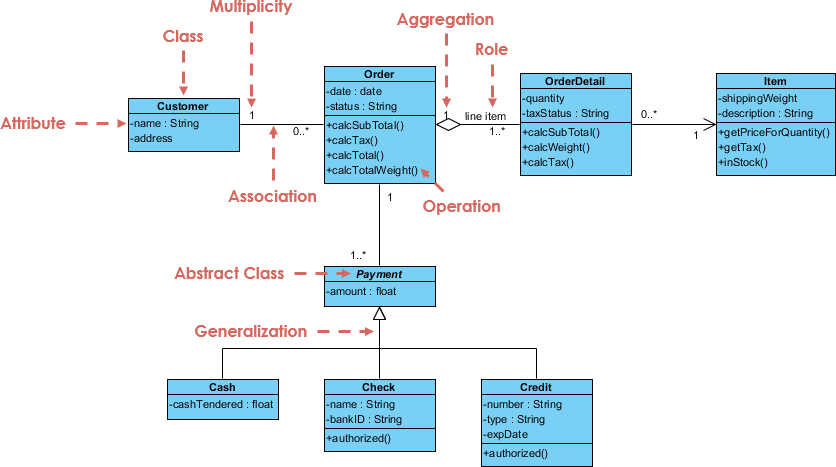
Class Diagram Example: Order System
Data Wrangling

Data Wrangling Intro

Data wrangling is the process of cleaning,restructuring,
and enriching data.It can turn,or map,
large amounts of raw data into different format
that makes the data more useful for the purposes of consumption
and analysis,by better organizing it.

We've already seen some basic data wrangling in past times. Pretty much any time you use the `|` operator,you are performing some kind of data wrangling.

Regular expressions

Regular expressions are common and useful enough that it’s worthwhile to take some time to understand hwo they work.

  • . means “any single character” except newline.
  • * zero or more of the preceding match.
  • + one or more of the preceding match.
  • [a-zA-Z] any single word.
  • (RX1|RX2) either something that matches RX1 or RX2.
  • ^ the start of the line.
  • $ the end of the line.

grep

Print lines that match patterns(man grep)

Usage: grep [OPTION..] PATTERNS [FILE…]

sed

Stream editor for filtering and transforming text.
A stream editor is used to perform basic text transformations
on an input stream (a file or input from a pipeline).

s for substitution

The slash as a delimiter.

1
2
date 
echo $(date) | sed 's/[0-9]*//g'

Using & as the matched string

1
2
3
sed -r 's/[0-9]+/|&|/g' <(date)
sed 's/[a-zA-Z]*/& &/g' <(echo Hello)
#Hello Hello

Using \1 to keep part of the pattern

the \1 refers to the characters captured by the escaped parentheses.

What does \1 in sed do?

1
2
3
4
echo 'abc1abc2abc3' | sed 's/\(ab\)c/|\1|/'
# |ab|1abc2abc3
echo 'abc1abc2abc3' | sed 's/\(ab\)\(c\)/\2-\1/g'
# c-ab1c-ab2c-ab3

awk

awesome awk

Processing workflow

Every AWK execution consist of following three phases:

  • BEGIN{...} are actions performed at the beginning before the first text character is read.
  • [condition]{...} are actions performed on every awk record(default text line)
    • every awk record is automatically split into awk fields.
  • END{...} are actions performed at the end of the execution after last text character is read.


Global variables

  • $0 value of current awk record(whole line without line-break)
    • $1,$2…values of first,second…awk filed.
  • FS Specifies the input awk field separator–how awk breaks input record into fields(default:a whitespace)

Builtin functions

  • print,printf(),sprintf(),
    • printing functions
  • length()
    • length of a string argument
  • ~
    • regexp search
  • substr()
    • splitting string to a substring
  • split()
    • split string into an array of strings
  • index()
    • find position of an substring in a string
  • sub() and gsub()
    • (regexp) search and replace (once respectivelly globally)

Example

1
ps | awk 'BEGIN{print "PID     AWK record\n";cnt = 0} $1 ~ "[0-9]+"{printf("%d,%s\n",$1,$0);cnt += $1} END{printf("summary:%d\n",cnt)}'

Analyzing data

You can do math directly in your shell using bc,a calculator that can read from STDIN.

Example

1
ps | grep -se '[0-9]' | awk '{print $1}' | paste -sd + | bc -l

How to Use a .gitignore file

Introduction

When you make commits in a git repository,
you choose which files to stage to commit.
But what if there are some files that you never want to commit?

How .gitignore Works

A .gitignore file is a plain text file
where each line contains a pattern/directories to ignore.
You can have mutiple .gitignore files.
The patterns in the files are relative to the location of that .gitignore file.

Patterns

1
2
3
4
5
6
7
8
9
10
11
12
13
14
15
16
17
18
19
20
21
22
23
# Literal file names
test.py

# Directories
## You can ignore entire directories,
## just by including their paths and putting a slash(/) on the end.
logs/
# If you leave the slash off the end,
# it will match both files and directories.

# Wildcard
## The * matches zero or more characters(except the slash /).
*.log
## You can also use the ?,which matches any one character except for the slash.

# Negation
## You can use a prefix of `!` to negate a file that would be ignored.
!example.log

# Double Asterisk
## ** can be used to match any number of directories.
**/.idea/

Local Repository .gitignore Rules

If there are some files you want to ignore for just this repository,
you can put them in .git/info/exclude

Global .gitignore Rules

If there are some files you want to ignore in all repositories on your computer,
you can put them in a global .gitignore file ~/.gitignore.

1
git config --global core.excludesFile ~/.gitignore

Notes

Git will not ignore the file if you have already committed if.
You have to untrack the file first.

1
2
git rm --cached FILENAME 
git rm -r --cached DIRECTORIES

Debugging

If you’re having trouble,
you can use git check-ignore -v filename/directories

Shell Tools and Scripting

Shell Scripting Intro

Most shells have their own scripting language with variables, control flow and its own syntax.
What makes shell scripting different from other scripting programming language is that
it is optimized for performing shell-tasks.
Thus,creating command pipelines,saving results into files,
and reading from standard input are primitives in shell scripting,
which makes it easier to use than general purpose scripting languages.
For this section we will focus on bash scripting since it is the most common.

Variables

To assign variables in bash,use the syntax foo=bar,
and access the value of the variable with $foo.
Note that foo = bar will not work
since it is interpreted as calling the foo programing with arguments = and bar.
In general,in shell scripts the sapce character will perform argument splitting.

String

String in bash can be defined with ' and " delimiters,
but they are not equivalent.
String delimited with ' are literal strings,
and will not substitute variables values whereas " delimited strings will.

1
2
3
4
5
foo=bar
echo "$foo"
# prints bar
echo '$foo'
# prints $foo

Control Flow

As with most programming languages, bash supports control flow techniques
including if, case, wihle and for.Similarly,
bash has functions that take arguments
and can operate with them.

1
2
3
4
5
6
mcd(){
mkdir -p "$1"
# create directory
cd "$1"
# cd the directory just created.
}

Here $1 is the first arguments to the script/function.
Unlike other scripting languages,
bash uses a variety of special characters
to refer to arguments, error codes, and other relevant variables.

Below is a list of some of them.
A more comprehensive list can be found here

  • $0 - Name of the script.
  • $1 to $9 - Arguments to the script,$1 is the first argument like argv in C language.
  • $@ - All the arguments.
  • $# - Number of arguments.
  • $? - Return code(status) of the previous command.
  • $$ - Process identification number(PID) for the current script.
  • !! - Entire last command ,including arguments.A common usage is sudo !!.
  • $_ - Last argument from the last command.

Commands will often return output using stdout,errors through stderr,
and return code to report errors in a more script-friendly manner.
The return code or exit status is the way scripts/commands have to communicate how execution went.
A value 0 usually means everything went OK.
Anything different from 0 means an error occurred.

Conditionally Execute Commands

Exit codes can be used to conditionally execute commands using &&(and operator)
and ||(or operator),both of which are short-circuiting operators.
Commands can also be separated within the same line using a semicolon ;.
The true program will always hava a 0 return code
and the false program will always hava a 1 return code.

1
2
3
4
5
6
7
8
9
10
11
12
false || echo "op, fail"
# op, fail
true || echo "will not be printed"
# will not be printed
true && echo "This went well"
# This went well
false && echo "will not be printed"
# will not be printed
true ; echo "This will always run"
# This will always run
false ; echo "This will always run"
# This will always run

Process Substitution

more info

Another common pattern is wanting to get the output of a command as a variable.
This can be done with command substitution.
whenever you place $(CMD) it will execute CMD,
get output of the command and substitute it in place.
A lesser known similar feature is process substitution.
<(CMD) will execute CMD and place the output in a temporary file named pipe.
and substitute the <() with that file’s name .
This filename is passed as an argument to current command.
If the >(CMD) form is used, writing to the file will provide input for CMD in ().
If the <(CMD) form is used, the file passed as an argument should be read to obtain the output of list.

1
2
3
4
5
6
7
8
9
10
11
#diff <(ls foo) <(ls bar)
# This will show differences between files in dirs FOO and BAR.
date | cat
cat <(date)
# Equal to date | cat
echo <(date) <(date) <(date)
# dev/fd/63 dev/fd/62 dev/fd/61
date > >(cat)
# writing to the file will provide input for cat
echo >(cat)
# dev/fd/63

Expand Expression

When launching scripts, you wil often want to provide arguments that are similar.
Bash has ways to making this easier, expanding expression by carrying out filename expansion.

  • Wildcards - When you want to perform some sort of wildcard matching,you can use ? and * to math one or more amount
    of characters respectively.
  • Curly braces{} -When never you have a common substring in a series of commands,you can use curly braces for bash to
    expand this automatically.
1
2
3
4
5
6
convert image.{png, jpg}
# will expand to
convet image.png image.jpg

touch {foo, bar}/{a..d}
# This create files foo/a ,foo/b....foo/d;bar/a...bar/d

AJAX

AJAX Intro

AJAX = Asynchronous JavaScript And XML.
AJAX just uses a combination of:

  • A browser built-in XMLHttpRequest object(to request data from a web server)
  • JavaScript and HTML DOM(to display or use data)

AJAX allows web pages to be updated asynchronously
by exchanging data with a web server behind the scenes.
This means that it’s possible to update parts of a web page,
without reloading the whole page.

JS AJAX Template

1
2
3
4
5
6
7
8
9
10
11
12
13
14
15
16
17
18
19
20
21
22
23
24
25
26
27
28
29
30
31
32
33
<!DOCTYPE html>
<html>
<body>
<h2>The XMLHttpRequest Object</h2>
<div id="demo">
<p>Let AJAX change this text.</p>
<button type="button" onclick="loadDoc()">Change Content</button>
</div>
<script>
// Create an XMLHttpRequest object
if (window.XMLHttpRequest) {
//For all modern browsers(Chrome, Firefox, IE, Edge, Safari, Opera)
xmlhttp = new XMLHttpRequest();
} else {
//For the old version IE browser
xmlhttp = new ActiveXObject("Microsoft.XMLHTTP");
}
// Send a request
// xhttp.open(method, url, async)
xhttp.open("post", "http://localhost:8080");
xhttp.send();

//Process data
xhttp.onreadystatechange = function (resp) {
// When readyState is 4 and status is 200,
// the response is ready
if (this.readyState == 4 && this.status == 200) {
//
}
};
</script>
</body>
</html>

jQuery AJAX

jQuery load() Method

THe jQuery load() method loads data from a server
and puts the returned data into the selected element[$(selector)]
$(selector).load(url, data, callback)

  • The required URL parameter specifies the URL you wish to load.
  • The optional DATA parameter specifies a set of query key/value pairs to sent along with the request.
  • The optional CALLBACK parameter is the name of a function to be executed after the load() method is completed.

Template

1
2
3
4
5
6
7
8
9
10
11
12
13
14
15
16
17
18
19
20
21
22
23
24
25
26
<!DOCTYPE html>
<html>
<head>
<script src="https://ajax.googleapis.com/ajax/libs/jquery/3.6.0/jquery.min.js"></script>
<script>
$(document).ready(function () {
//An event occurs
$("button").click(function () {
$("#div1").load("demo_test.txt", function (responseTxt, statusTxt, xhr) {
//responseText -contains the resulting content if the call succeeds.
//statusTxt -contains the status of the call
//xhr -contains the XMLHttpRequest object
if (statusTxt == "success")
alert("External content loaded successfully!");
if (statusTxt == "error")
alert("Error: " + xhr.status + ": " + xhr.statusText);
});
});
});
</script>
</head>
<body>
<div id="div1"><h2>Let jQuery AJAX Change This Text</h2></div>
<button>Get External Content</button>
</body>
</html>

jQuery $.get() method

The $.get() method request data from the server with an HTTP GET request.
$.get(URL,callback)

  • The required URL parameter specifies the URL you wish to request.
  • The optional callback parameter is the name of a function to be executed if the request succeeds.

Template

1
2
3
4
5
6
7
8
9
10
11
12
13
14
15
16
17
18
<!DOCTYPE html>
<html>
<head>
<script src="https://ajax.googleapis.com/ajax/libs/jquery/3.6.0/jquery.min.js"></script>
<script>
$(document).ready(function () {
$("button").click(function () {
$.get("demo_test.asp", function (data, status) {
alert("Data: " + data + "\nStatus: " + status);
});
});
});
</script>
</head>
<body>
<button>Send an HTTP GET request to a page and get the result back</button>
</body>
</html>

jQuery $.post() method

The $.post() method requests data from the server using an HTTP POST request.
$.post(URL, data, callback)

  • The required URL parameter specifies the URL you wish to request.
  • The optional data parameter specifies some data to send along with the request.
  • The optional callback parameter is the name of a function to be executed if the request succeeds.

Template

1
2
3
4
5
6
7
8
9
10
11
12
13
14
15
16
17
18
19
20
21
22
23
<!DOCTYPE html>
<html>
<head>
<script src="https://ajax.googleapis.com/ajax/libs/jquery/3.6.0/jquery.min.js"></script>
<script>
$(document).ready(function () {
$("button").click(function () {
$.post("demo_test_post.asp",
{
name: "Donald Duck",
city: "Duckburg"
},
function (data, status) {
alert("Data: " + data + "\nStatus: " + status);
});
});
});
</script>
</head>
<body>
<button>Send an HTTP POST request to a page and get the result back</button>
</body>
</html>

axios

axios
Using CDN

<script src="https://cdn.jsdelivr.net/npm/axios/dist/axios.min.js"></script>

send a post request

1
2
3
4
5
6
7
8
9
10
11
axios({
method: 'post',
url: '/user/12345',
data: {
firstName: 'Fred',
lastName: 'FlintStone'
}
}).then(function (resp){
<!-- process response data -->
resp.data
});

send a get request

1
2
3
4
5
6
7
axios({
method: 'get',
url: 'http://localhost:8080',
}).then(function (response) {
<!-- process response data -->
resp.data
});

Basic jQuery Usage

jQuery Intro

jQuery is a lightweight,”write less, do more”, JavaScript Library.
jQuery greatly simplifies JavaScript programming.
jQuery takes a lot of common tasks that require many lines of JavaScript code to accomplish,
and wraps them into methods that you can call with a single line of code.
The jQuery library contains the following feature:

  • HTML/DOM manipulations
  • CSS manipulations
  • HTML event methods
  • Effects and animations
  • AJAX
  • Utilities

jQuery Start

Adding jQuery to web pages

There are several ways to start using jQuery on your web site:

  • Download the jQuery library from jQuery.com
  • Include jQuery from a CDN,like Google.

jQuery CDN

If you don’t want to download and host jQuery yourself,
you can include it from a CDN(Content Delivery Network).
Google Hosted Libraries

1
2
3
<head>
<script src="https://ajax.googleapis.com/ajax/libs/jquery/3.6.1/jquery.min.js"></script>
</head>

jQuery Syntax

The jQuery syntax is tailor-made for selecting HTML elements,
and performing some action on the elements.

Basic Syntax is

$(selector).action

  • A $ sign to define/access jQuery.
  • A (selector) to “query”(or find) HTML elements.
  • A jQuery action() to be performed on the element(s).

jQuery - Get and Set Content and Attributes

One very important part of jQuery is the possibility to manipulate the DOM.
DOM = Document Object Model
The DOM defines a standard for accessing HTML and XML documents.

Get Content - text(),html(),and val()

Three simple,but useful,jQuery methods for DOM manipulation are:

  • text() -Sets or returns the text content of selected elements.
  • html() -Sets or returns the text content of selected elements(including HTML markup).
  • val() -Sets or returns the value of form fields.

Example

1
2
3
4
//get the content of the div element.
$("#div").text()
//set the content of the p element(including HTML markup)
$("#p").html("<b>Hello World!</b>")

Difference between attr() and prop()

Both are used to get attribute values.
Boolean attributes such as checked only set the default or initial value.
The most common boolean attributes are checked, selected, disabled, and readOnly

  • doc
  • The prop() method should be used for boolean attributes/properties and for properties which don't exist in html( such as window.location).
  • All other attributes (ones you can see) can and should continue to be manipulated with the attr() method.

Example

1
2
3
4
5
6
7
8
9
10
11
12
13
14
15
16
17
18
19
20
21
22
23
24
25
26
27
28
29
30
31
32
33
34
35
36
<!DOCTYPE html>
<html>
<head>
<script src="https://ajax.googleapis.com/ajax/libs/jquery/3.6.0/jquery.min.js"></script>
<style>
#a1 {
background-color: green
}
</style>
<script>
$(document).ready(function () {
$("button").click(function () {
var a1 = $("#a1")
var a2 = $("#a2")
alert("$('#a1').attr():" + a1.attr("style"));
// $('#a1').attr():undefined
alert("$('#a2').attr():" + a2.attr("style"));
//$('#a2').attr():background-color : yellow
alert("$('#a1').prop():" + a1.prop("style"));
//$('#a1').prop():[object CSSStyleDeclaration]
alert("$('#a1')'s href(prop):" + a1.prop("href"));
//$('#a1')'s href(prop):
alert("$('#a1')'s href(attr):" + a1.attr("href"));
//$('#a1')'s href(attr):undefined
alert("$('#a1').css():" + a1.css("background-color"));
//$('#a1').css():rgb(0, 128, 0)
});
});
</script>
</head>
<body>
<p><a id="a1">link a1</a></p>
<p><a id="a2" style="background-color : yellow">link a2</a></p>
<button>Show Value</button>
</body>
</html>

Get and Set CSS Classes

jQuery has several methods for CSS manipulation.

  • addClass() -Adds one or more classes to the selected elements.
  • removeClass() -Removes one or more classes from the selected elements.
  • toggleClass() -Toggles between adding/removing classes from the selected elements.
  • css() -Sets or returns the style attributes.

Example

1
2
3
4
5
6
7
8
9
10
11
12
13
14
15
16
17
18
19
20
21
22
23
24
25
26
27

<html>
<head>
<script src="https://ajax.googleapis.com/ajax/libs/jquery/3.6.0/jquery.min.js"></script>
<script>
$(document).ready(function () {
$("button").click(function () {
$("h1, h2, p").toggleClass("blue");
// first add classed to the elements
// and then remove the classes from the elements.
});
});
</script>
<style>
.blue {
color: blue;
}
</style>
</head>
<body>
<h1>Heading 1</h1>
<h2>Heading 2</h2>
<p>This is a paragraph.</p>
<p>This is another paragraph.</p>
<button>Toggle class</button>
</body>
</html>

Return a CSS Property.

To return the value of a CSS property,use the following syntax
css("propertyName")
To set the value of a css property,use the following syntax
css("propertyName","value")

Functional Interface

Functional Interface

Functional interface is an interface having exactly one abstract method
called functional method to which the lambda expression’s parameter and return types are matched.
Functional interface provides target types for lambda expressions and method references.

Functional Interface rules

As discussed @FunctionalInterface is a runtime annotation
that is used to verify the interface follows all the rules
that can make this interface as functional interface.

  • Interface must have exactly one abstract method.
  • It can hava any number of default methods because they are not abstract and implementation is already provided by
    same.
  • Interface can declare an abstract method overriding one of the public method from java.lang.Object,
    that still can be considered as functional interface.
    The reason is any implementation class to this interface will have implementation for this abstract method either
    from super class(java.lang.Object) or defined by implementation class itself.
1
2
3
4
5
6
7
8
9
10
11
12
13
14
15
16
17
18
@FunctionalInterface
public interface FunctiionalInterface {
void say(String s);

@Override
String toString();//overriden from Object class

@Override
public boolean equals(Object obj);//overriden from Object class

default void beforeTask(){
System.out.println("before task...");
}

default void afterTask(){
System.out.println("after task...");
}
}

Predicate

java.util.function.Predicate has a boolean-valued function that takes an argument and return boolean value.

definition
1
2
3
public interface Predicate<T>{
boolean test(T t); // functional descriptor
}

Example

1
2
3
4
5
6
7
8
9
10
11
12
13
14
15
16
17
18
19
20
21
22
23
24
25
26
27
28
29
import java.util.ArrayList;
import java.util.List;
import java.util.function.Predicate;
import java.util.stream.IntStream;

public class PredicateTest {
public static void main(String[] args) {
Predicate<Integer> odd = num -> num % 2 != 0;
Predicate<Integer> positive = num -> num > 0;

Integer[] nums = IntStream.rangeClosed(-10, 10).boxed().toArray(Integer[]::new);

System.out.println("Odds:" + filter(nums, odd));
System.out.println("Positives:" + filter(nums, positive));
System.out.println("PositiveOdds:" + filter(nums, odd.and(positive)));
System.out.println("PositiveOrOdds:" + filter(nums, odd.or(positive)));
System.out.println("Evens:" + filter(nums, odd.negate()));
}

public static <T> List<T> filter(T[] array, Predicate<T> p) {
List<T> ret = new ArrayList<>();
for (T t : array) {
if (p.test(t)) {
ret.add(t);
}
}
return ret;
}
}

Output

1
2
3
4
5
Odds:[-9, -7, -5, -3, -1, 1, 3, 5, 7, 9]
Positives:[1, 2, 3, 4, 5, 6, 7, 8, 9, 10]
PositiveOdds:[1, 3, 5, 7, 9]
PositiveOrOdds:[-9, -7, -5, -3, -1, 1, 2, 3, 4, 5, 6, 7, 8, 9, 10]
Evens:[-10, -8, -6, -4, -2, 0, 2, 4, 6, 8, 10]
It has a couple of default methods which you can use it:
Method Description Example
and(Predicate<? super T> other Returns a composite predicate that represents logical` of two predicates(p1 AND p2) Predicate positiveOdd = odd.and(positive)
or(Predicate<? super T> other) Returns a composite predicate that represents logical OR of two predicates(p1 OR p2) Predicate positiveOrOdd = positive.or(odd)
negate() Returns a composite predicate that represents logical negation of this predicate Predicate negative = positive.negate()

Consumer

java.util.Consumer accepts an argument and returns no result.

definition
1
2
3
public interface Consumer<T>{
void accept(T t);
}

Example

1
2
3
4
5
6
7
8
9
10
11
12
13
14
15
16
17
18
19
20
21
22
23
24
25
26
27
28
29
30
31
32
33
34
35
36
import java.util.ArrayList;
import java.util.List;
import java.util.function.Consumer;
import java.util.function.Predicate;
import java.util.stream.IntStream;

public class ConsumerTest {
public static void main(String[] args) {
Predicate<Integer> odd = p -> p % 2 == 0;
Integer[] nums = IntStream.rangeClosed(-10, 10).boxed().toArray(Integer[]::new);
// [-10, -8 .... 10]
List list = filter(nums, odd);

Consumer<List<Integer>> negateNum = l -> {
for (int i = 0; i < l.size(); i++) {
l.set(i, -l.get(i));
}
};

Consumer<List> showList = l -> {
l.forEach(System.out::println);
};

negateNum.andThen(showList).accept(list);
}

static <T> List<T> filter(T[] array, Predicate<T> p) {
List<T> list = new ArrayList<>();
for (T t : array) {
if (p.test(t)) {
list.add(t);
}
}
return list;
}
}

Output

1
2
3
4
5
6
7
8
9
10
11
10
8
6
4
2
0
-2
-4
-6
-8
-10

Consumer has also one default method called andThen(Consumer<? super T> after
which returns a composite consumer where second consumer will be executed after execution of first one.
If the first consumer throws any exception then the second consumer will not be executed.

Supplier

java.util.function.Supplier doesn’t accept any argument but returns a result.

definition
1
2
3
public interface Supplier<R>{
R get();
}

Example

1
2
3
4
5
6
7
8
9
10
11
12
13
14
15
16
17
18
19
20
21
22
23
24
25
26
27
28
29
30
31
32
import java.util.Random;
import java.util.UUID;
import java.util.function.Consumer;
import java.util.function.Supplier;

public class SupplierTest {
public static void main(String[] args) {
Supplier<Long> randomId = () -> new Random().nextLong();
Supplier<UUID> uuid = () -> UUID.randomUUID();

Consumer<Trade> showMsg = t -> {
System.out.println("trade id:" + t.tradeId + ",trade location:" + t.location);
};

Trade trade = new Trade();
populate(trade, randomId);
showMsg.accept(trade);
populate(trade, uuid);
showMsg.accept(trade);

}

static <R> void populate(SupplierTest.Trade t, Supplier<R> supplier) {
t.tradeId = String.valueOf(supplier.get());
t.location = "Hub";
}

static class Trade {
String tradeId;
String location;
}
}

Function<T, R>

java.util.function.Function accepts an argument and return result.

definition
1
2
3
public interface Function<T, R>{
R apply(T t);
}

Example

1
2
3
4
5
6
7
8
9
10
11
12
13
14
15
16
17
18
19
20
21
import java.util.function.Function;

public class FunctionTeset {
public static void main(String[] args) {
Function<Integer, Double> half = n -> n / 2.0;

Function<Double, String> showMsg = d -> "value:" + d + ",type:" + d.getClass();
// half -> showMsg
System.out.println(half.andThen(showMsg).apply(520));

Function<String, Integer> mulTen = s -> Integer.parseInt(s) * 10;
// before <String> -> <Integer> -> <Double>
// mulTen -> half
System.out.println(half.compose(mulTen).apply("520"));

Function<String, String> itself = Function.identity();
//return it's input argument.
System.out.println(itself.apply("Identity of Function"));

}
}

Output

1
2
3
value:260.0,type:class java.lang.Double
2600.0
Identity of Function
Function has a couple of default ant static methods:
Method Description
default Function<V, R> compose(Function<? super V, ? extend T> before Returns a composed function that first applies the before function to its input,and then applies this function to the result
default Function<T, V> andThen(Function<? super R,? extend V> after Returns a compose function that first applies this function to its input,and then applies the after function to the result
static Function<T, T> identity() Returns a function that always return its input argument.Basically it is a helper method that used in Collector implementation

Method references

Java Method References

Java provides a new feature called method reference in Java 8.
Method reference is used to refer method of functional interface.
It is compact and easy form of lambda expression.
Each time when you are using lambda expression to just referring a method,
you can replace your lambda expression with method reference.

Types of Method References

  1. Reference to a static method.
  2. Reference to an instance method.
  3. Reference to a constructor.

Reference to a Static Method

You can refer to static method defined in the class.
Following is the syntax and example which describe the process of referring static method.

Syntax

ContainingClass::staticMethodName

Example

1
2
3
4
5
6
7
8
9
10
11
12
13
public class StaticMethodReference {
public static void saySomething(){
System.out.println("This is a static method!");
}
public static void main(String[] args) {
Sayable s = StaticMethodReference::saySomething;
s.say();
}
}

interface Sayable{
void say();
}

Output

This is a static method!

Reference to an Instance Method

like static methods,you can refer instance methods also.

Syntax

containingObject::instanceMethodName

Example

1
2
3
4
5
6
7
8
9
10
11
12
13
14
public class InstanceMethodReference{
public void saySomething(){
System.out.println("This is instance method!");
}
public static void main(String[] args) {
Sayable s = new InstanceMethodReference()::saySomething;
s.say();
}
}

interface Sayable{
void say();
}

Output

This is instance method!

Reference to a Constructor

You can refer a construct by using the new keyword.

Syntax

ClassName::new

Example

1
2
3
4
5
6
7
8
9
10
11
12
13
14
15
16
17
18
19
20
21
public class ConstructorReference {
public static void main(String[] args) {
Messageable hello = Message::new;
hello.getMessage("Hello!");
}
}

class Message {
Message(String msg) {
System.out.println(msg);
}

Message(String name, String msg) {
System.out.println(name + msg);
}
}

interface Messageable {
Message getMessage(String msg);
}

Output

Hello!

Lambda in Java

Lambda Expression

Lambda expressions are introduce in Java 8 and are touted to be the biggest feature of Java 8.
Lambda expressions facilitates functional programming,and simplifies the development a lot.

Syntax

A lambda expression is characterized by the following syntax.

parameter -> expression body

Following are the important characteristics of a lambda expression.

  • Optional type declaration–No need to declare the type of parameter.The compiler can inference the same from the
    value of the parameter.
  • Optional parenthesis() around parameter–No need to declare a single parameter in parenthesis.For multiple
    parameters,parentheses are required.
  • Optional curly braces{}–No need to user curly braces in expression body if the body contains a single
    statement.
  • Optional return keyword–The compiler automatically returns the value if the body has a single expression to
    return the value.Curly braces are required to indicate that expression return a value.

Lambda Expressions Example

1
2
3
4
5
6
7
8
9
10
11
12
13
14
15
16
17
18
19
20
21
22
23
24
25
26
27
28
29
30
31
32
33
34
35
36
37
38
39
40
41
42
43
44
45
46
47
public class LambdaTest {
private int operate(int a, int b, MathOperation m) {
return m.operation(a, b);
}

public static void main(String[] args) {
LambdaTest test = new LambdaTest();

// with type declaration
MathOperation addtion = (int a, int b) -> a + b;

// without type declaration
MathOperation subtraction = (a, b) -> a - b;

// with return statement along with curly braces
MathOperation multiplication = (int a, int b) -> {
return a * b;
};

// without return statement and without curly braces
MathOperation division = (a, b) -> a / b;

System.out.println("\33[33m");//set the yellow foreground color.
System.out.println("10 + 5 =" + test.operate(10, 5, addtion));
System.out.println("10 - 5 =" + test.operate(10, 5, subtraction));
System.out.println("10 * 5 =" + test.operate(10, 5, multiplication));
System.out.println("10 / 5 =" + test.operate(10, 5, division));

// without parenthesis
GreetingService gs_without = message -> System.out.println(message);

// with parenthesis
GreetingService gs_with = (message) -> System.out.println(message);

gs_without.sayMessage("parameter without parenthesis.");
gs_with.sayMessage("parameter with parenthesis.");

}
}

interface MathOperation {
int operation(int a, int b);
}

interface GreetingService {
void sayMessage(String message);
}

Verify the result

Compile the class using javac compiler as follows:

$javac LambdaTest.java && java LambdaTest

It should produce the following output:

1
2
3
4
5
6
10 + 5 =15
10 - 5 =5
10 * 5 =50
10 / 5 =2
parameter without parenthesis.
parameter with parenthesis.

Following are the important points to be considered in the above example.

  • Lambada expressions are used primary to define inline implementations of a functional interface,an interface
    with a single methode only.
  • Lambda expressions eliminates the need of anonymous class and gives a very simple powerful functional programming
    capability to Java.

ANSI

ANSI

ANSI escape sequences
ANSI escape sequences are a standard for in-band-signaling
to control cursor location,color,font styling, and other options on video text terminal and terminal
emulators
.

C0 control codes

Fe Escape code

if the ESC is followed by a byte in the range 0x40 to 0x5f,the escape sequences is ot type Fe.

some type Fe ANSI escape sequences
Code C1 Abbr Name Effect
ESC [ 0x9B CSI Control sequences Introducer

ANSI control sequences

some ANSI control sequences
Code Abbr Name Effect
CSI n m SGR Select Graphic Rendition Sets colors and style of the characters following this code

SGR(Select Graphic Rendition) parameters

The control sequences CSI n m,named Select Graphic
Rendition(SGR),
sets display attribute.

n Name Note
0 Reset or normal All attributes off
1 Bold or increased intensity
2 Faint,decreased intensity,or dim May be implemented as a light font weight like bold
3 Italic
4 underline
30-37 set foreground color
40-47 set background color
90-97 set bright foreground color
100-107 set bright background color

colors

Several attributes can be set in the same sequences,separated by the semicolons(;).
Each display attributes remains in effect util the following occurrence of SGR resets it.
If no codes are give,CSI m is treated as CSI 0m(reset/normal)

Examples:

1
2
3
`ESC[0m`:reset all attributes
`ESC[31m`:to get red letters
`ESC[1;30;47m`:to get bold(bright) black letters on white background color
FG BG Name
30 40 Black
31 41 Red
32 42 Green
33 43 Yellow
34 44 Blue
35 45 Magenta
36 46 Cyan
37 47 White

\033 represents ESC in ASCII code

1
2
3
4
5
6
7
8
9
10
11
12
13
14
15
16
17
18
#define ASNI_FG_BLACK   "\33[1;30m"
#define ASNI_FG_RED "\33[1;31m"
#define ASNI_FG_GREEN "\33[1;32m"
#define ASNI_FG_YELLOW "\33[1;33m"
#define ASNI_FG_BLUE "\33[1;34m"
#define ASNI_FG_MAGENTA "\33[1;35m"
#define ASNI_FG_CYAN "\33[1;36m"
#define ASNI_FG_WHITE "\33[1;37m"
#define ASNI_BG_BLACK "\33[1;40m"
#define ASNI_BG_RED "\33[1;41m"
#define ASNI_BG_GREEN "\33[1;42m"
#define ASNI_BG_YELLOW "\33[1;43m"
#define ASNI_BG_BLUE "\33[1;44m"
#define ASNI_BG_MAGENTA "\33[1;35m"
#define ASNI_BG_CYAN "\33[1;46m"
#define ASNI_BG_WHITE "\33[1;47m"
#define ASNI_NONE "\33[0m"

  • Copyrights © 2022-2023 Ataraxia

请我喝杯咖啡吧~